Candle-making is one of the most popular hobbies around. There are plenty of reasons why so many people choose to melt down their own wax, pop in some wicks, wait for things to cool, and enjoy the magic of handmade goods in their homes.
Granted, there are always store-bought candles, which are unlikely to ever fade in popularity. According to the National Candle Association, US retail sales of candles are estimated at approximately $3.2 billion annually, and manufacturer surveys show that 90% of all candles are purchased by women.
But making them yourself is a fun, simple craft and can give you the opportunity to personalize each and every one. You can make larger candles in big bail-lid jars or opt for smaller ones in mini Mason jars. If you like classic white candles, you can stick with plain wax. But if you’re into colors, you can choose any shade of the rainbow (or at least any color that you can create with a combination of crayons). And then you have all kinds of options when it comes to adding scents and decorative touches. As an added bonus, it's super inexpensive!
Whether you’re using candles as an old-school source of light, a romantic mood-setter, a stylish touch of home decor, or a holiday gift for friends and family, you might want to try out one of the various ways you can make them yourself, like the drip-and-dry method using melted tallow (i.e., animal fat) and a good ol’ cotton string that (obviously super-patient) pioneers used way back when candles were a necessary source of light. But from what my kids told me about their candle-making lesson while on a field trip, that seemed a little too ambitious for me and WAY too messy to attempt in my kitchen. So I opted for the more straightforward jar method.
Read on to see how my (somewhat successful, somewhat messy, and totally fun) attempt at candle-making went.
Supplies

Luckily, the necessary components for DIY candles are relatively cheap and not too hard to find.
Here's what you'll need:
- Candle wax
- Candle wicks
- Jars
- A double boiler (I used a pot and large cans)
- Oven mitts
- Tongs
- Wax paper
- Crayons (optional)
- Glitter (optional)
- Candle fragrance (optional)
Prepping Counters and Wax

I started out by putting down two layers of wax paper. I had a feeling this was about to get messy, and I definitely didn’t want wax or color from the crayons ruining my clean countertops.
I then took the candle wax and discovered that it was actually one huge block that had been partially split. I got my biggest knife and started (carefully) hacking off smaller chunks of wax. Things were already getting messy.
Prepping Wicks and Jars

Earlier in the week, I had noticed the wicks in my little tea light candles were stuck to the bottom of their holders, and I figured this was done to prevent the wick from floating up when the wax was still in liquid form. I thought I’d attempt to do the same thing and grabbed my glue stick. I placed a good glob of glue on the bottom of each wick and used a chopstick to firmly place it in the middle of the bottom of the jar.
Unfortunately, a glue stick wasn’t the best choice, and the wicks didn’t stick as well as I’d hoped. Perhaps using a mighty glue gun would work better next time.
Melting the Wax

After tracking down candle-making tips from the internet, I learned that wax must be heated in a double boiler for safety reasons. Using a double boiler merely means boiling water in one large pot and then placing another smaller pot in that water to melt your wax. I didn’t want to get wax in any of my pots, so I used large apple juice cans instead of a smaller pot.
I melted the wax over medium heat and used tongs to keep the can upright, which was a little trickier than I anticipated — that can was very wobbly.
Adding the Scent

Adding scents to your candles is totally optional, but I definitely wanted to try it out. I opted for apple cinnamon and black cherry, both incredibly enticing (and seasonally appropriate!) scents that I was hoping would soon fill my house.
When the wax was fully melted, I added a little of the scent liquid. Or at least I tried to add a little. A whole heck of a lot came pouring out and ended up running down the side of the jar and all over my hand. I was annoyed, even though I smelled great.
Next time, I’ll use an eyedropper so that I can add a little bit of the liquid instead of accidentally using nearly half the bottle at once.
Attempting a Glitter Candle

My kids were interested in what I was up to and thought I should try to make a glitter candle, which seemed like an easy enough, yet lovely, idea.
After putting a layer of blue glitter at the bottom of a bail-lid jar, I slowly poured in clear wax. The wick immediately started to bend and wouldn’t stay centered, so I taped it to a chopstick that I laid on the top of the jar. I then added more glitter and stirred it into the wax with a second chopstick.
The glitter slowly sank to the bottom. Bummer! But I wasn’t willing to give up yet.
I let the wax cool a little, then added more glitter and stirred it in, thinking the slightly thicker, cooled wax might hold the glitter in place. It didn’t. While some glitter stuck to the wax at the top of the jar, most of the glitter still sank to the bottom… just a little slower this time.
Not the greatest success, TBH. But at least the abundance of scent I had poured in came through — the candle smelled like a black cherry delight, even unlit.
Opting for Color

Since the glitter experiment didn’t exactly work out, I decided to mix things up by making colored candles. I grabbed a box of crayons and sorted out a few shades, ultimately opting for red, blue, and green.
Melting Wax and Crayons

To create colored wax, you melt the white/clear wax like normal. Then when it’s completely liquefied, you carefully drop in the crayons.
I started with red, and as soon as I added the crayons they began to melt, spreading into the clear wax and turning it into a lovely, cherry-like shade.
Red Candle

When the crayons had completely melted into the clear wax, I popped on my oven mitts and took the can of wax out of the water. I then slowly poured the wax into the clear jar, adjusted the wick slightly to make sure it was still centered, and put the jar aside to cool and harden.
FYI: Don’t throw away your extra wax! I’ll explain why you might need it below.
Blue Candle

For the second candle, I was aiming for a blue shade with a slight hint of purple. I used a beautifully rich blue crayon and a deep purple crayon to get the desired color. While the purple failed to come through at all, in my opinion, I still think the blue shade is gorgeous for a candle.
Mini Green Candles

For my green candles, I wanted to use my adorable mini Mason jars. While one candle was definitely a success, the other was initially a nasty fail.
While the can of wax was still in the boiling water, it slipped, and some water got inside without me noticing. When I then poured the wax into the jar, the water ran out first, filling half the jar with a gross brown liquid before the melted wax covered it on top. After being annoyed at the mistake, I figured out there was still a way to save my tiny candle (more on that below).
Filling the Holes

Apparently, it’s normal for the wax to settle in the jar and a hole to form at the top. This is when you’ll need the leftover wax. If any of your candles have a dent after the wax has hardened, remelt your wax and simply fill it in. I easily did this with both my red and blue candles as well as the one successful green candle.
For my messed-up green candle, I first poked a hole in the top layer of wax and asked my husband to drain the nasty water (I was too grossed out to do it). I then poured in the leftover green wax, attempting to fill up the gap at the bottom.
Cleanup

Cleaning up after making the candles was relatively easy, thanks to the wax paper I had put down at the start.
However, you’ll definitely want to note that you should NOT pour your leftover wax down the drain, as it can solidify and clog things up. Also, if you drip any wax on your stove, be sure to clean it up right away. Wax can be dangerous, as it can catch on fire if it gets too hot.
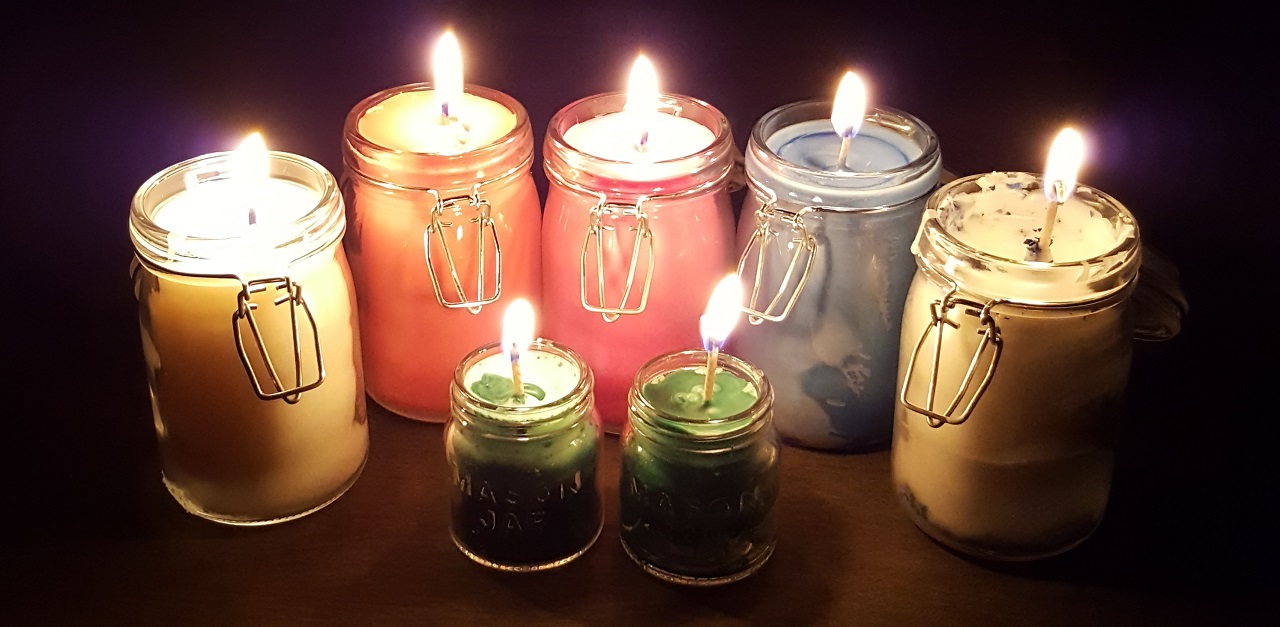
Final Product

The candle-making process was pretty simple and straightforward, although it’s absolutely important to pay close attention to what you’re doing and make sure that you’re being super careful and safe. As for my final product, I had various levels of success with the candles.
I didn’t have enough leftover wax to fully refill the blue and green candles, so they ended up with little dents in the top (which I suppose I could fix if I got some more crayons and melted down more wax). But other than looking a little rough, the candles turned out nicely, especially considering it was my very first try. They were pretty cute (even the wonky-looking ones), the scent was lovely, and thankfully, they actually lit on fire, which is basically the whole point of candles.
I can certainly see why candle-making is a popular pastime, and I have plenty of ideas for ways I can switch things up next time (and, yes, there definitely will be a next time). I’d love to try layering the colors of wax by adding them one at a time and allowing each layer to cool before adding the next. I’d also like to figure out how to add glitter or other decorations (like flower petals) without them sinking to the bottom.
Finally, I hope my family likes getting candles as gifts, because I’ll be passing these babies out like flammable candy when the holidays roll around!


