There is nothing more satisfying than taking fabric and sewing it into something creative, functional, and fun.
Looking for a new project to take on? We have rounded up five easy projects to show off your sewing skills.
Trust us, these fun ideas will have you happily crafting away for hours. These quick and easy sewing projects are perfect for beginners or experts.
Beach Towels With Pockets

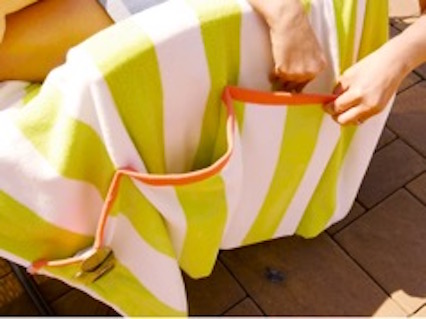
Trips to the beach will never be the same after you make one of these beach towels with pockets. Now, instead of rummaging for your book and sunscreen, you’ll always have them within easy reach!
Instructions:
- Lay your towel out flat and fold the bottom end up approximately one foot.
- Pin it into place along the open edges, and then sew so that the fold becomes one big pocket along the bottom of the towel.
- Split the big pocket into smaller pockets by sewing vertically from the folded edge of the pocket to the open edge. If you have a striped towel, use the stripes as guidelines.
- Trim stray threads and pack the pockets up with your beach read, sunglasses, and SPF.
- Hit the beach, and enjoy!
This project is easily doable with any sewing machine, but opting for one with digital features will allow you to customize your stitches or create initials and designs.
Sweater Dog Bed

Using most standard sewing machines, you can make an adorable bed for your dog without dropping extra dollars at the store. This bed is deceptively simple to make. All you need is a large sweater and some cotton batting!
After sewing the sweater neck closed, stuff the sleeves and the body with cotton batting. Then, you can sew the sleeves closed and stitch them onto the body to finish the fuzzy bed.
This is a great project for sewing beginners to practice some standard stitches, while seasoned sewers can knock out this project in no time.
Instructions:
- Lay your old sweater out flat and right-side out, then sew the neck opening shut.
- Sew a V-shaped line from under the left arm arching across the top of the chest and ending under the right arm.
- Remove cotton batting from a pillow, and stuff through the sleeves to fill arms, neck, and upper chest.
- Stuff the body of the sweater from the bottom opening until full. Sew the bottom opening shut when finished.
- Tuck one sleeve inside the other and hand-sew shut.
- Wrap the arm loop around the body of the pillow. Sew the edges together by hand.
- Flip over, and give to your dog.
- Watch your favorite pup enjoy!
Fourth of July Headband

Using your sewing skills, you can show off your patriotism while rocking a seriously stylish hair accessory. All you’ll need to make this headband are two different types of jersey fabric in red, white, and blue.
Instructions:
- Measure the part of your head where you’d wear a headband.
- Cut out a rectangle in each piece of fabric in that length and at a width of five inches.
- Fold fabric lengthwise, wrong side out, and pin.
- Sew up the sides and turn right side out.
- Arrange the fabric tubes in an X shape. Fold the bottom piece around the top piece so they’re linked.
- Pin the open ends together and sew them up.
It’s pretty easy to make using a machine with adjustable stitches. Trust us, you’ll want to make one for every special occasion and holiday!
Bedazzled Beanies

Instead of throwing out unwanted or broken jewelry, you can use it to create a fashionable “bedazzled” beanie. The jewels add a fashionable touch to these hats, and you'll love knowing you have a one-of-a-kind piece.
If you want a professional-looking edge, you can flip the bottom of the beanie under and sew, or you can use a serger. After that, you can turn your new beanie to the other side and hand-stitch the jewels onto the front. These hats are both cozy and fashion-forward — plus, they’re so easy to make! (Full instructions here.)
Dog Cool-Off Pad

Make sure that your dog enjoys the warmer weather as much as you do with a doggy cool-off pad. To make one, you’ll need a towel, fleece fabric, and ice packs.
Instructions:
- Cut fleece into four strips slightly smaller than the width of the towel or blanket you’re using.
- Make sure all four fit onto the towel from top to bottom.
- Pin the bottom edges of each strip to the towel and sew down.
- Now, pin the left and right edges of all strips to the left and right edges of the towel.
- Using a sewing machine with interchangeable needles, sew straight up the sides of the towel to close up the edges of the pockets.
- Sew straight up the center to split the pockets in half, into two per row.
- Split smaller pockets the same way, leaving four pockets per row, and 16 overall.
- Pack pockets with ice packs.
- Set up outside, and watch your pooch enjoy!
If you can’t wait to get sewing, make sure to SHARE this post with friends and family.Let us know which sewing project you want to tackle next.


