March was a weird month in New York state. On the first of the month, we entered a new, greener stage. The ban on plastic bags that had been a big topic of conversation for years finally went into effect.
I'm all for a greener New York, of course. There's just one tiny issue. As someone who doesn't drive, it's a major bummer to get all the way to the store, have a cart full of items, and realize you forgot your bags. One day, I set out to look for the reusable bags I've collected over the years. They were buried under a mountain of plastic bags, which I largely keep out of habit. As a dog owner with a yard to clean up, they come in handy, but not for much else.
By the end of the month, New Yorkers were sheltering in place, and I was looking for a project. I mined Pinterest for ideas on what I could do with the bags and came across plarn.
No, that's not a typo. Plarn, or plastic yarn, is yarn made out of plastic bags. Once it is made into yarn, you can use it for a number of fun projects. I set to it. I was determined to make a bag that would look cute and be easy to take with me for any shopping endeavors. A total crocheting newbie, I had no idea what I was getting myself into. I learned a lot about plastic bags as a medium and the beauty of upcycling along the way.

To start, you'll need to prep the bags. Make sure they're clean with minimal tearing, and then cut off the top of the bag, including the handles, and the bottom. When you're through, the bag should be an open loop. Lay it flat.

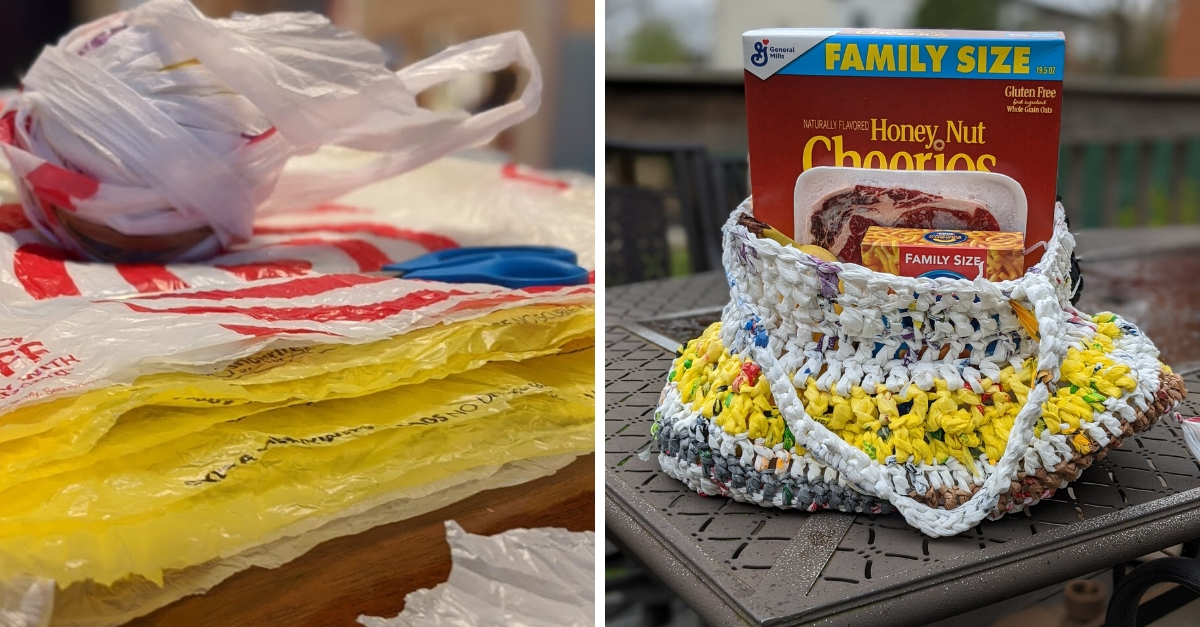
Repeat with all the bags you have. How many you'll need will depend on what you're looking to make with them. For the reusable bag project I chose, I estimated I'd need about 50.
Stack all the bags flat with one common corner lined up. It's easiest to manage if you put the smaller bags on top and the bigger bags on the bottom.

Cut the bags into strips. For standard-sized plastic grocery bags, you'll want to cut them into four even strips. Don't cut the bags all the way through. Rather, leave a strip about 1 to 1½ inches wide at the top of the bag.
Next, cut a diagonal from the edge of the back of the bag to the first cut in it. You're creating the beginning of threads you'll later tie together.

If you've kept up so far, you should have loops with cuts in them that are still attached. Hold the bags so that the connected part is upright. Some find it easier to hold the bag on their arm as they cut.
Cut on a diagonal from the first loop to the second loop and repeat for the remaining loops. When you're done, you'll have strips of bags with an extra loop at the end.

You want to cut along the one side that will continue the loop. The loose ends will be where you tie the bag together. It's up to you how long you make a continuous thread. You may find it easier to tie it all together and make one ball of plarn. I made three smaller ones.

This is the part where I confess I've never crocheted anything in my life. This was brand-new territory for me, so it came with a lot of research.
I decided to try to make the bag in the style of this tutorial by Festival Foods. Before I started, I took some yarn to practice chaining and different stitches. It took a day or two of practice before I was comfortable with what I was doing. I took another day to get comfortable working with the plarn, which is trickier than standard yarn.

I tried doing a chain stitch and getting to work on a rectangle, but it wasn't quite right. I turned to this video for guidance on how to make the rectangle that would be the bottom of the bag. Keep in mind that your size might be different depending on how big of a bag you're looking to make.

Getting through the rectangle didn't mark the end of my rookie mistakes. I decided to go with single crochets around the bag to build up the sides. I was three-quarters of the way through the plarn when I looked at what had just become corners.
The bag stood up a bit, but it flopped and would require a lot more plarn than I had on hand. That's when I made the tough decision to unravel back down to the rectangle and take a new approach.

This time, I did two rounds of double crochet. To start, you want to do a slip stitch into one corner of the rectangle. Chain three before double-crocheting around the entirety of the bag until you're back where you started.
When you get back, slip through the third chain and do a slip stitch. Then chain three before starting your next round of double crochets.

For the next round, instead of double-crocheting on every stitch, you'll want to change it to every other stitch. This helps the bag cinch a bit as you build it up. It also switches up the style in a subtly noticeable way.

When you finish that round, go back to the original pattern. That means double-crochet without dropping any stitches. Once you go around two more times, evaluate what you've got. In my case, I was happy with the size.
I was also exhausted. A more experienced crocheter informed me this was way big for a first project. Whether it's your first or 50th, don't feel bad if you're having a hard time. I certainly didn't get it perfect.
If you want to get rid of all the hanging pieces, you can carefully cut them, knot them closer to the bag, or flip the bag inside out to deal with fewer of them.

Next up are the handles of the bag. Mark where you want them to be with some pins or some yarn. To get started, prepare the plarn on your hook. Slip-stitch to one of the marked points and then chain to begin. Chain as long as you want the handle. I chained 45 for the bag I made here.

Once you chain your handle to the desired length, do another slip stitch to join it to the other side of the bag. Next, do a single chain to turn around before starting single crochets back in the direction you came from. Chain into the top of the bag to complete the attachment.

Repeat with the other handle. Check to make sure your handles are the same length. The different thicknesses of pieces of the bags can lead them to differ, even with the same number of stitches. Make adjustments where necessary, and voilà!
It wasn't easy by any means, but it was challenging in a good way. Not only was it a fun and different way to spend my spare time over a week, but it was a good way of getting my mind off all the other things it could be on. Plus, I feel really good about having a reusable bag that's easy to store and lightweight.