It’s 2018, and celebrities and fashion gurus alike are embracing the fringe trend once again. Scroll through your favorite store’s website and you’ll likely see a variety of fringe accessories, from jackets to purses to shoes (yes, there are really fringe shoes). Turn on your TV and you’ll probably see your favorite celebrities rocking the statement style as well — like Ariana Grande in her “Into You” music video. I get it, though. Fringe shimmies and sways, and there’s freedom in its movement. Plus, flappers have more fun, amirite?
Whether it gives you the fierce flapper-reminiscent feeling of the ‘20s or the liberated rock 'n’ roll vibe of the ‘70s, fringe is never really on the fringe of going out of style. It may disappear for a beat, but it always makes its way back, because let’s face it: adding texture to your outfit truly takes it over the top. It’s practically timeless.
Since I hate spending money and have a shamefully competitive spirit, I challenged myself to make my own version of one of these forever-trendy fringe jackets I’m seeing EVERYWHERE. Breaking the bank buying one for over $100 just seemed silly, especially when the concept was so simple. So I accepted the challenge with open arms.
But before I jumped in aimlessly, I needed to gather some inspiration. Naturally, my first stop was Pinterest — the quintessential stop for all things trendy. The results were overwhelming, to say the least. Then I poked around a bit through the online catalogs for Forever 21, ASOS, and Missguided. As it turns out, you can literally add fringe to any kind of jacket — leather, denim, suede, you name it. Personally, the denim look appealed to me most, as it’s a timeless piece that’s easy to work with and ideal for any season. But you could probably scour your own closet and use any jacket you already own, no matter the style.
What I’m Working With
Since I didn’t have a denim jacket I was willing to potentially screw up, I headed to the local thrift shop. After about five minutes of rummaging through the aisles, I found denim heaven. A perfectly sized Wrangler jacket called my name, and it only cost $8. Amen.
https://giphy.com/gifs/showtime-season-1-comedy-3o6fIZnOmdgIZm9mBW
The Other Supplies
Before heading home, I swung into JOANN Fabric to find some fringe. There were quite a few kinds to choose from, but I decided to go the rustic, cowboy-esque route with some brown suede. In the same section, I saw a trim that matched perfectly, so I scooped that up, too.
JOANN Fabric haul:
- 2 yards of suede fringe, $7
- 2 yards of patterned trim, $5
Other materials you might need:
- Fabric scissors
- Straight pins
- Bleach (if you’re crazy, like me)
- Needle/thread/sewing machine OR fabric glue
The Creative Process: Step 1
I am notorious for making things way more complicated than they need to be, so I decided to dip-dye the perfectly fine fringe I bought with bleach. What can I say? I like to live life on the edge.
Really, though, I just wanted to add some more dimension to the fringe. In a glass bowl, I poured a few ounces of bleach and mixed it with about the same amount of water (to dilute it a bit). It smelled terrible.
https://giphy.com/gifs/filmeditor-mean-girls-movie-l2YWrHdkNTproTA9q
I proceeded to dip a couple inches at the bottom of the fringe into the bleach mixture until the entire 2 yards was dip-dyed. If you decide to copy this step, be sure to have a towel nearby to lay the already-dipped fringe on. Otherwise, you’ll get bleach everywhere and regret everything.
Then, I just went about my day until it dried.
The Creative Process: Step 2
Once the fringe was dry, it was time for pinning. You’ll need a pretty large, flat surface and some straight pins for this. I carefully laid out the fringe in line with the trim and pinned it to the back with as much fringe showing as possible. Not going to lie: I stabbed myself a few times! This is dangerous stuff, y'all.
https://giphy.com/gifs/breakingbad-breaking-bad-walter-white-3ohc11UljvpPKWeNva
The Creative Process: Step 3

How you approach the next step depends on a few things: what’s available to you, how crafty you are, and how much time you have. Since I have a sewing machine and consider myself a craft queen, I sewed the trim and the fringe together. But you could also hand-sew them together or even use handy-dandy fabric glue! The choice is yours.
The Creative Process: Step 4
I lined up the newly sewn-together fringe and trim on the jacket exactly where I wanted it to go. Then I did more pinning and stabbing. I’m fine. All is well.
The Creative Process: Step 5
Last came the most important step of all: sewing the trim/fringe combo onto the jacket (or, you know, gluing, if you choose that route). I chose to add the fringe along the back of the jacket and the back of the sleeves, but you can add it on the front pockets, around the cuffs, around the shoulders, or wherever else your heart desires for some added texture. You get some fringe! You get some fringe! Everybody gets some fringe!
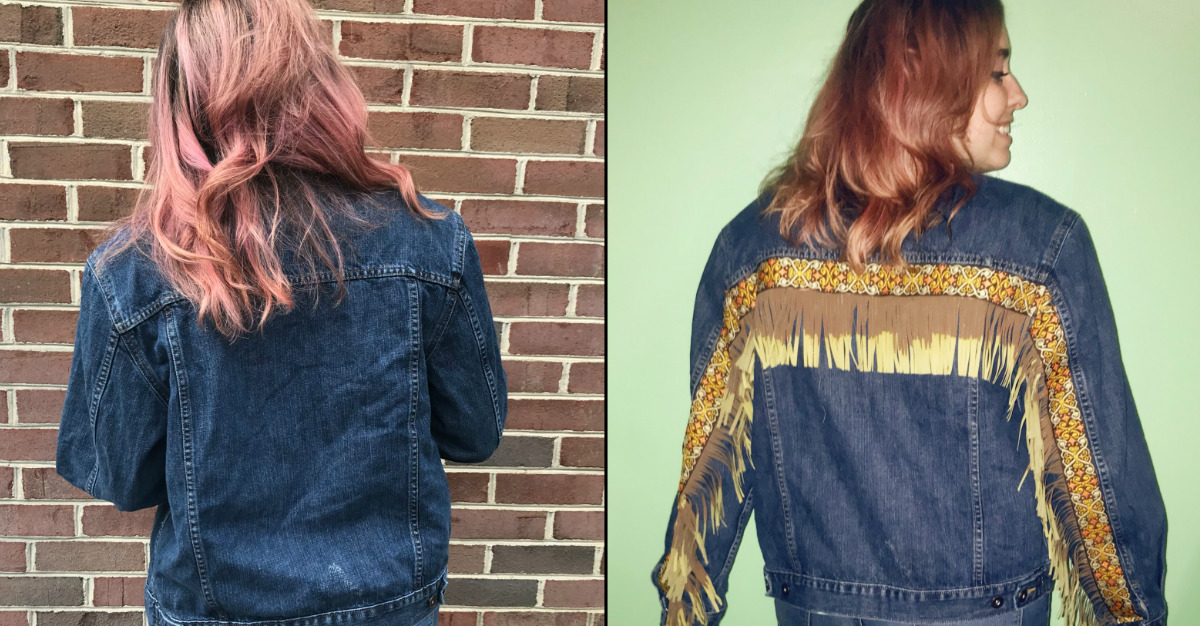
The Results
Voila! I am now trendy, and you can be, too! And it feels so much better knowing that (a) I made it myself, and (b) I spent less than $20! DIY fringe benefits, ladies and gentleman.
Seriously, How Cute Is This?
BRB, wearing this EVERYWHERE!