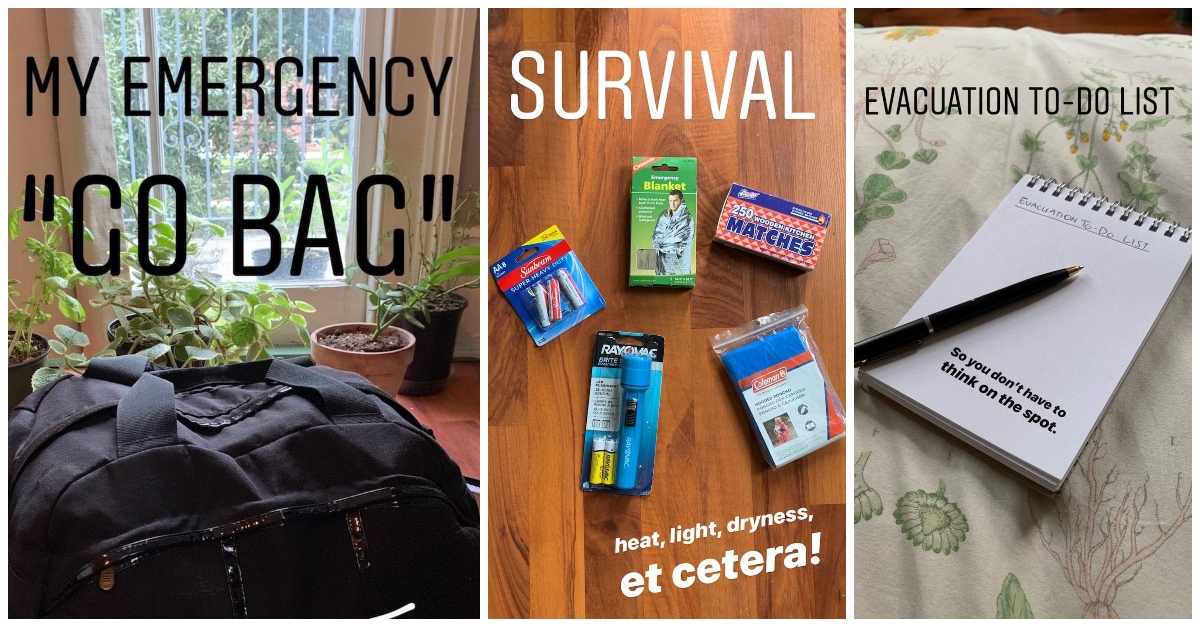
An emergency “go bag” is a bag that allows you to quickly evacuate the area in a disaster situation. After many years of contemplating the apocalypse and watching Netflix shows about natural disasters, I finally made a go bag of my own, and I’m here to report back.
A go bag goes by many other names — a “bug-out bag” or an “emergency preparedness kit,” among others. Different bags can serve different purposes, but the general idea is the same — you want to pack food, water, and survival items to keep you alive for three days if necessary. By assembling all of these items before anything terrible happens, you save precious time and mental energy in an emergency. Basically, you can skip the “OMG, what do I take? What do I do?” stage and cut straight to grabbing your bag and getting out of there.
There are a lot of great reasons to have a go bag on hand. Maybe you live in an area that’s prone to natural disasters of some kind, aka most of the planet. Maybe you’re afraid that your area will soon be prone to natural disasters because you just read that UN report on climate change and it gave you nightmares for a week. Or maybe you’re a “prepper” or survivalist — someone preparing to survive anything, including the end of Western civilization.
Regardless of your personal situation, it’s a good idea to have a go bag on hand (the Red Cross recommends it).
In my case, I’ve been wanting to make a go bag for practically forever — and procrastinating about it for just as long. As a millennial, I’ve been thinking about climate change and the apocalypse since I was a child. I’ve never actually lived through a natural disaster, but I’ve always been deeply worried by my own lack of preparedness for them. Rather than do anything about it, normally I just… think about it a lot. I read survival tips for enjoyment. Yes, I am as fun as I sound.
So last week, I finally got to work creating the go bag of my dreams (or nightmares). I attempted to fill it with everything that I would need for an emergency evacuation, as instructed by countless real experts as well as “experts” on the internet. This is the result.
Emergency Go Bag 101: Getting Started

A go bag is designed to get you from point A to point B in a disaster situation. The idea is to keep the bag in your house so that if you need to evacuate to a safer area, you can grab the bag and leave. Some people also keep go bags in their vehicles so they can evacuate without heading home first or so they can make it home safely. There are all types of disasters, and therefore, all types of bags! Fun.
However, although the specifics might vary, all go bags contain the same few types of items. They’re designed to last you exactly three days — 72 hours — so they contain enough food and water to sustain you for that amount of time. They also contain clothes, personal hygiene items, survival items of some kind, and important documents such as IDs.
You can turn any bag into a go bag, although you will need it to be somewhat large and comfortable to carry, since it’ll be heavy. You can buy the necessary items for a go bag at online retailers like Amazon, grocery stores, hardware stores, and outdoor retailers.

As you plan out your shopping list, it’s important to consider what type of emergency you’re actually planning for and customize your bag accordingly. Are you hoping to be able to rough it, if necessary? Will you be evacuating to your grandma’s cabin? If you have no idea where to begin, consider looking up the emergency evacuation procedures for your area and designing your kit accordingly.
In my case, I live in a hot, humid urban area that is prone to hurricanes, floods, and the occasional tornado. In a mandatory evacuation, I’d be leaving by car, bus, or plane. If I failed to get out in time, I might also have to “shelter in place” for a few days. If it were a more chaotic disaster situation — let’s say the actual apocalypse hits New Orleans — then I’d probably flee to my family’s house or to my girlfriend’s family’s house, ideally also by car.
Basically, my go bag is for making sure that I don’t die before I get to where I’m going and that I can rebuild my life afterward. I am not planning to have to actually survive in the wilderness for any length of time (although I do hope to acquire those skills at some point).
But everyone’s situation is different, so plan accordingly.
1. Water and Food

The first and most essential part of any emergency kit is water. You know, so you don’t die. Most people in the US take access to clean water for granted, but even if you’re in an urban area, the water might not be safe to drink in a disaster.
Most experts recommend one gallon of water per person per day, so a go bag should have at least three gallons. If you’d like, you can also buy a portable water filter system.

Next up, food. You need nonperishable items that will keep you alive and functional for three days. Useful foods include protein bars, dried fruit or meat, nuts, peanut butter, canned meat, canned fruit, and canned vegetables. If you expect to have access to a heat source and cookware, you might also add other items that can be cooked, like grains and beans. Meals Ready to Eat (MREs) are another option to consider — they’re self-contained meals that the military uses in the field.
Now this is the part where I admit that I got overwhelmed, and as you can see, I didn’t buy everything that should go into my go bag just yet (which is fine, because hurricane season is officially over for the year). I need more food than this, and I’m planning to add more preserved fruits and vegetables.
Also, I bought some emergency rations just in case.

These rations aren’t food, per se. They are just bare minimum calories so that, again, you won’t die. I find them reassuring to have.
2. Personal Health and First Aid

Your bag should contain a first-aid kit, supplemented with any other medical items that you need, like Tums, allergy medication, birth control, and so on.
You should also pack personal hygiene items, such as a toothbrush, toothpaste, soap, and tampons or pads.
If you wear glasses or contacts, consider packing a spare pair of spectacles and/or contact lens solution.
I also packed a set of survival towels, which are really nifty — they are the size of a dime but expand when submerged in water.
3. Safety

While evacuating, you might encounter danger of some kind, like a violent animal or a patch of black ice or a creepy dude. I feel like my bag should have a knife or pepper spray or something, but as of now, it does not. I did, however, buy a whistle to signal for help if needed.
4. Survival Gear

You also need basic survival gear, like a flashlight and matches. And don’t forget extra batteries!
I also packed a poncho because of the likelihood of rain in this area, plus an emergency blanket because I’m terrified of being cold at night. If you expect to have to sleep outdoors, you’ll need other items here, too, like a lightweight tent and sleeping bag.
Also, three other items that I don’t have yet but should really buy: a battery-operated radio, a paper map of the area, and a basic survival guide.
5. Important Documents

Assuming that the world isn’t completely ending, you will need to restart your life when this whole thing is over. To that end, you should make copies of important documents and put them on a flash drive. Include your passport, driver’s license, Social Security card, birth certificate, deeds to any property, proof of insurance, and anything else that you can’t lose.
Write down emergency contact information, including phone numbers and addresses.
Also, take a photo of each room in your house. This will help with any insurance claims later.
Put this flash drive in a plastic bag so that it doesn’t get ruined by water.

Lastly, I wrote an evacuation to-do list so that I don’t have to think on the spot when disaster strikes.

On it, I wrote items like “Turn off utilities” and “Bring large outdoor items inside.” Again, this will vary a great deal depending on the most common natural disasters in your area.
6. Clothes

Pack one change of clothes, suitable for your climate. I packed a T-shirt, leggings, underwear, socks, a sweatshirt, and a hat.
7. Miscellaneous Necessities

Pack any other random necessities that you’d want on hand in an emergency, like a phone charger and some cash.
Also, do you have pets? If so, you need food and water for them, too, and don’t forget their vaccine records.
Great. Finally, I shoved everything into my duffel bag. It is so heavy!
I'm Ready!

Did I pack everything?! Oh God, definitely not. But I’m readier than I’ve ever been.
Happily, I discovered that there was no good reason to put this off for as long as I did, because making a go bag is really not that difficult — it just takes a bit of time, money, and patience.
Also, it’s a continuous process. You will need to replace items as they expire, and you can upgrade your kit as you learn more about survival situations and/or have extra money in your pocket.
My go bag is still in progress, but most importantly, I finally have one! Come at me now, disasters! (Kidding. Please don’t.)


