I love Halloween and everything that goes along with it, including dressing up in costumes, putting up spooky decorations, and, of course, pumpkins! I love carving jack-o'-lanterns with classically silly expressions and scary faces. I also love to try new pumpkin-related ideas each year. Last time around, I opted to try out both drip painting pumpkins (which were wonderfully messy and oh-so artistic) and fall floral pumpkins (an idea that’s simply lovely and beautifully classy). This year, I decided to attempt the drilled pumpkin light project that I came across on the Dream a Little Bigger website. It reminded me of a Halloween-ish disco ball light and I was hoping that it would create a funky light effect to my front porch area when it was lit up outside.
While Allison from Dream a Little Bigger used a fake pumpkin (which definitely worked out well), I was excited to try the technique on a real pumpkin. If you do intend to use a fake pumpkin, Allison notes that “as it goes with anything that gets hot, like light-bulbs, please don’t use this sucker unattended.” Especially if you intend to use it inside as an indoor lamp like Allison does, which is an undeniably adorable idea that would be a perfect addition to your seasonal décor.
Since I would be using a relatively nonflammable real pumpkin and mine would be going outside — on top of the fact that I planned on using a good old-fashioned candle to light things up — I figured my final product wouldn’t require constant vigilance.
With a list of things I would need and a plan in mind, I set out to make my own drilled pumpkin light. Read on to see how it went and to find out how you can make one of your own.
What You’ll Need

- Pumpkin (either real or fake)
- Electric drill and bits or strong skewer (or anything that pokes holes), if you don’t have a drill
- Knife and spoons
- Rags
- Washable marker (optional) *I only had a Sharpie so made super-light dots
- Candles or a lamp kit and low-wattage bulb
- Newspaper or tarp to protect your floor from a mess if you’re working inside
Step 1: Pick Your Pumpkin

As I mentioned above, you can either opt for a real or fake plastic pumpkin for this project. I went with a real one. While you could obviously choose whatever shape of pumpkin your heart desires, I decided to go with some classically round ones. And just in case I messed up on my first attempt, I picked up a second pumpkin as a backup.
Step 2: Wash Your Pumpkin If Necessary

I then used a rag to wash the outside of my pumpkin. I didn’t want muddy spots making my pumpkin look messy or dirty, and I didn’t want any muck blocking the holes I drilled. This was going to be the pristine disco light of pumpkins (minus the mirrored parts) if things ended up the way I had in mind.
Step 3: Choose Your Drill Bit

I didn’t feel like any of the drill bits we had would work well, so I ran out to quickly pick up a new one. I opted for a 5/16 inch bit which was one of the smaller ones available but looked like it would create the ideal size of holes (i.e. not too massive, but big enough to let light through). The package said it could penetrate wood, metal, and plastic, so obviously it could handle drilling through a pumpkin.
Step 4: Decide On A Pattern Or Opt For Random Dots

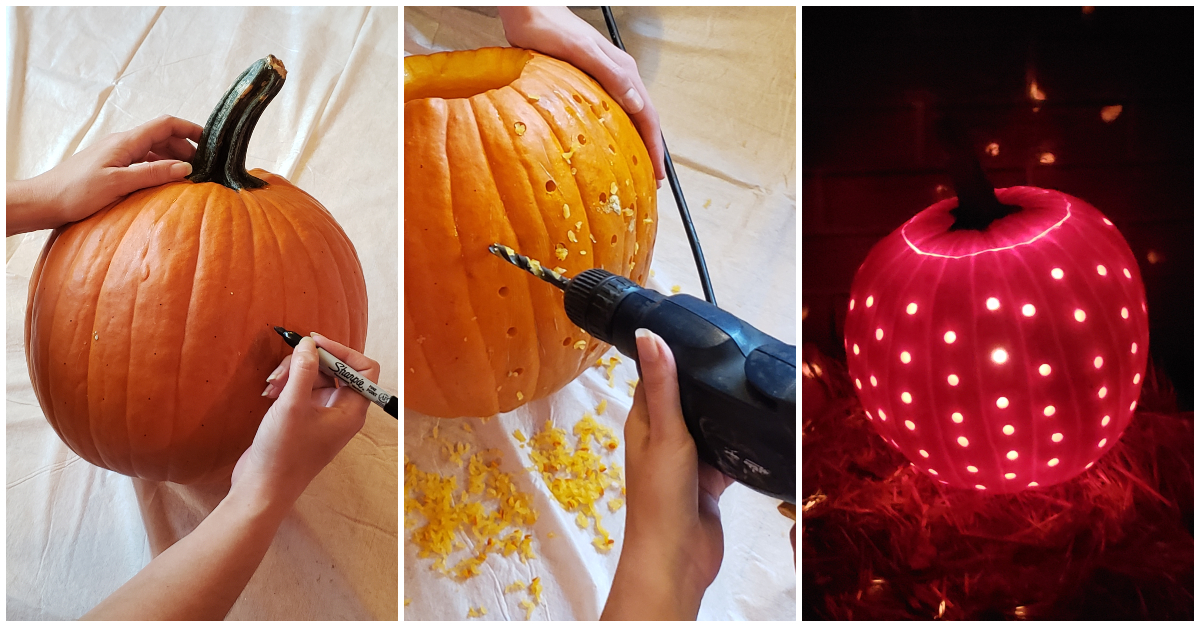
While the idea of getting a little wild with hole placement was appealing, I decided to go with random dots on my first try. However, if I try this again in the future, I might attempt something snazzier, like drilling the holes in diagonal lines or funky spirals. To ensure that I ended up with a placement that I was happy with, I used a marker to work out where I’d made my dots ahead of time.
Step 5: Remove The Top Of Your Pumpkin

I then cut the top off of my pumpkin the same way I would if I were carving a normal jack-o’-lantern. Although I did keep the hole on the smaller side since I wanted to be able to add as many drilled holes as I could so that it would let through as much light as possible.
Step 6: Clean Out Your Pumpkin

This is either your favorite part of carving a pumpkin or the stage that you hate the most. I happen to think it’s pretty darn fun, so dove into the mucky inside with a gusto and cleaned it out as much as possible. I made sure to make the sides of the pumpkin as smooth as I could so that the holes I made wouldn’t be obscured by strings of pumpkin guts.
Step 7: Start Drilling Holes

This was the part I had really been looking forward to tackling. I had my son hold the pumpkin steady for me, then positioned the drill against the dots I had made with the marker and began to make the holes. By using the drill it was incredibly easy, very quick, and was definitely fun. It also created perfectly round holes that looked nice even when the light wasn’t shining through.
Step 8: Wipe Off The Goo

As I was drilling, pieces of pumpkin flesh were loosened from each hole and while some went flying into the air, a lot of it ended up on the outside of the pumpkin. Once I was done making the holes, I took my rag and wiped off the outside of the pumpkin to get rid of all of the messy goo.
Step 9: Clean Out The Inside Again

The drilling had also loosened pumpkin flesh on the inside and I didn't want it to clog up the holes. So I grabbed my spoon and quickly scraped out the inside again to make sure it was as clean as possible.
Step 11: Set Up Your Pumpkin

It was then time to see how my pumpkin light project had turned out. When it was nighttime and dark enough, I took my pumpkin outside and set it up. (Yes, it’s on a haystack, but it had just rained so the stack was soaked and there’s a fire-extinguisher right inside the door in case anything went wrong.)
Step 10: Put In The Light

The only thing left to do at that point was to put a light in the pumpkin. I opted for a candle instead of a bulb, but made sure the candle was big enough to cast a bright enough light through the holes in the pumpkin. I lit the candle inside and put the pumpkin lid back on top before standing back and taking a look at the result.
Result

Wow! The result was even better than I could have hoped for. The entire pumpkin seemed to glow and cast spots of light in all directions. It definitely gave off a disco ball effect and was stunningly beautiful!
Final Thoughts

I deemed this project a Halloween success! It was super easy and so much fun to create. I was also obviously thrilled with the result. While I’ll still be carving-jack o’-lanterns with silly faces each year, I’ll definitely be making a drilled pumpkin light again. In fact, my kids were so interested in what I was doing that they asked if they could help make the second pumpkin into a light, so it looks like we’ll be drilling a pumpkin again before they head out trick-or-treating.