If you love everything about autumn and like to indulge in creative activities inspired by this gorgeous time of year, then you definitely have to try putting together a fall floral pumpkin.
While spending a little — OK, a lot — of time on Pinterest, I came across this simple yet stunning seasonal project. The shiny cream-colored pumpkin in the post I had spied was filled with beautiful white and pink flowers, purple petals, green leaves, and twisty vine-like branches. The link led me to a project on the Michaels craft store website where there was a list of materials and instructions to re-create its very fancy floral pumpkin arrangement.
If you’d like to use Michaels’ exact materials, the instructions list floral wire cutters, a hot-glue gun, hot glue sticks, a cream Ashland Princess Craft Pumpkin (30.4 cm), two Ashland Floral Stems in Taupe Wild Dahlia, one Ashland Fall Floral Stem in Wine Eucalyptus Branch, and one Ashland Fall Floral Stem in Dark Pink Cabbage Rose.
The instructions include four steps that guide you through cutting the stems, gluing the flowers, arranging the branch, and embellishing the entire thing in a precise way that will eventually result in a perfectly put-together end product that you would be proud to show off to all of your friends and family.
However, if you’re like me and prefer to put your own spin on crafty projects (high five to the other rogue Martha Stewart types out there!), then you can ignore all of the instructions above and just wing it like I did.
With the inspiration from Michaels and a general idea of what I was aiming for, I decided to try not just one but three different styles and arrangements. Frankly, even if I screwed up two of them, at least one was bound to look relatively decent… right?!
Read on to see how I fared creating my own fall floral pumpkins and to learn how you can make some of your own!
Pumpkin Choices

Even though the fake craft pumpkin used in the Michaels project is a great option if you want to keep your fall floral arrangement intact permanently, I wanted to use real pumpkins.
Picking pumpkins is always fun, even though I must confess that I’m probably a little too picky and insist on looking at roughly a thousand options before I pick one (this is only a slight exaggeration).
For this particular project, I chose three medium-sized pumpkins that were different shapes — one was rounder, one was more elongated, and one was sort of in the middle of the other two.
Flowers and Plants

I also decided to try both real and fake plants. I assumed the real plants might look a little better, but the fake ones would obviously last longer.
To save a little money, I checked out what my local dollar store had to offer and was pleasantly surprised to find fake flowers for fall, Halloween, and Christmas. Although I wasn’t making anything Christmas-related, the white holiday flowers were great for my Halloween-ish arrangement.
At home, I happen to have hundreds of aloe plants (this number is NOT an exaggeration) and thought that the spiky plant would make an interesting addition to my pumpkin display.
Other Supplies

The only other supplies I needed were a drop cloth to make sure the pumpkin mess didn’t end up all over the floor, a knife to cut off the tops of the pumpkins, and a few spoons to scoop out the pumpkins' guts.
My husband suggested his grandfather’s old knife that was once used to clean fish, while my son offered up his nature knife. They both looked scary!
Prepping the Pumpkins

First, I cut the tops off the three pumpkins and removed all of the icky insides. OK, maybe I just helped. In fact, my husband took over the knife duties because eek! My kids took over the pumpkin-gutting duties because yuck!
I’m totally willing to get messy, but when you have two little ones who are ready to scoop out those gooey strands and sticky seeds, you let them have at it.
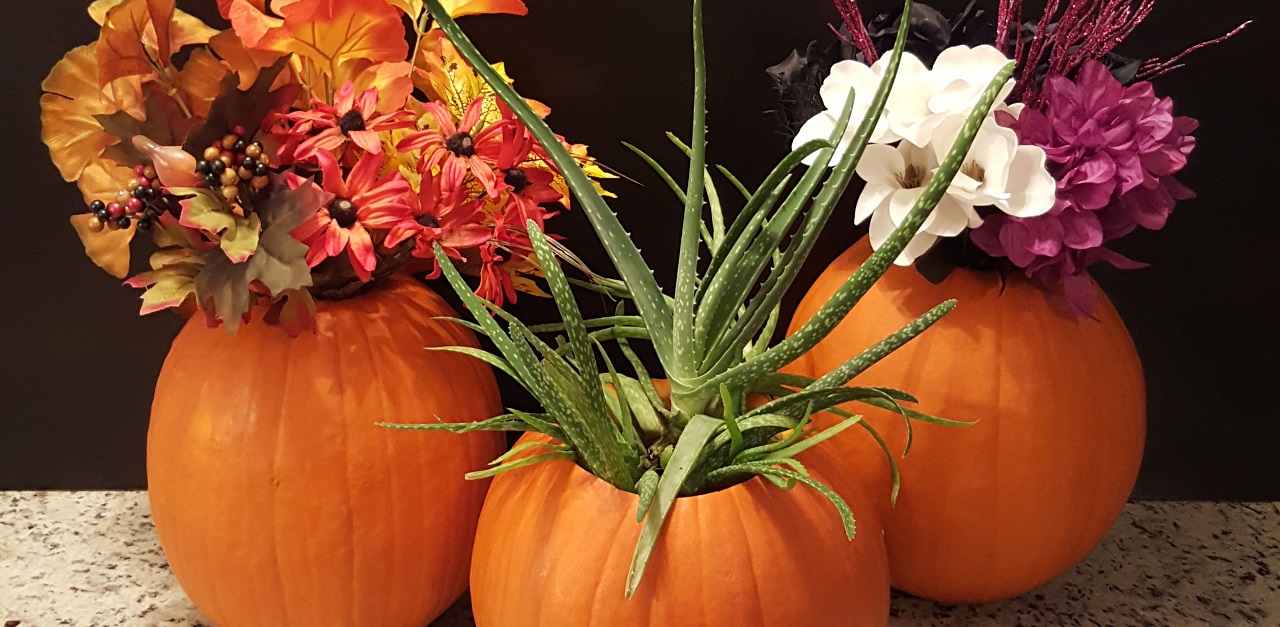
Pumpkin No. 1: Autumn Leaves and Flowers

For the first arrangement, I put together some very autumnal leaves and flowers. The flowers had long, thin red petals that had a slight orange shade near the center. The leaves were a range of burnt orange, gold, yellow, and green. The sprigs of green leaves also had clusters of dark berries and teeny, tiny figs.
Pumpkin No. 1: Arranging the Flowers

Arranging the flowers was simply a matter of adding them one at a time and trying out different placements. It was pretty obvious that the bigger leaves should go in the back so that they wouldn’t overwhelm the smaller flowers and little details like the berries and figs, which I popped in the front.
Pumpkin No. 1: Result

I felt like my arrangement using fake autumn leaves and flowers turned out beautifully. The colors of the flowers and leaves worked well with the color of the pumpkin, and because some of the floral bits were higher and some were wider, they filled out the space nicely.
I also like the fact that because I didn’t glue anything in place, I can rearrange them at any time. However, because they’re snugly in place (with a stem or two poked into the inner pumpkin for added grip), they won’t budge unless I want them to.
Pumpkin No. 2: Spooky Flowers

I couldn’t resist attempting a spooky arrangement when I spotted the black flowers that have tiny fake spiders hanging off the stems. Sorry you can’t see the spiders in the pics, but I knew you wouldn’t be able to spot them in the final version, so they’re a little hidden surprise for anyone who gets close to this arrangement!
I thought that including the purple and white flowers would add a necessary pop of color and contrast, while the sparkly branch bits would hopefully top it all off.
Pumpkin No. 2: Arranging the Flowers

This time, it was the black flowers that threatened to overwhelm everything else, so I placed them in the back. I added the white and purple flowers to the front and pulled the black flowers up slightly higher so that they could still be seen easily. I then placed the sparkly branches right in the middle and spread them out so that they were angled in different directions.
Pumpkin No. 2: Result

I thought my spooky arrangement was another fabulous success. It was just as easy to arrange (and rearrange if necessary), and it’s a perfect choice if you’re looking to create something with a fun Halloween vibe.
You could also reuse these floral bits in other arrangements that aren’t so spooky by swapping out the black flowers for another brighter option.
Pumpkin No. 3: Aloe

For my third pumpkin, I wanted to try something a little different.
I grabbed one of my aloe plants that was already in a durable glass vase that would fit inside of the pumpkin. I added a few more aloe plants to fill out the space — don’t worry, I’ll replant them properly after I’m done with this arrangement! — in an attempt to make sure that the spikes were pointing out in all directions.
Pumpkin No. 3: Arranging the Aloe

When I tried to drop the aloe into the pumpkin, the hole ended up being a little too small, and the vase wouldn’t fit. So I trimmed a little more around the edge of the pumpkin’s opening, and voila! Perfect fit. I then arranged the aloe a little more to make sure that it was sticking out all kinds of wild ways.
Pumpkin No. 3: Result

Although this result was drastically different from the other arrangements, I loved it just as much. The perfectly curvy pumpkin and spiky aloe looked so great together, because of both their contrasting shapes and their vibrant colors.
On top of that, I couldn’t help but think that if I add a silly face to that pumpkin, I’d have a quirky character with wonderfully crazy hair!
Final Thoughts

I was thrilled with all three of my fall floral pumpkins (can I still call the aloe one a floral pumpkin?). This project was super simple and pretty darn affordable, thanks to cheap pumpkins, dollar-store fake flowers, and the fact that I used my own aloe.
I was also happy that I had done three different arrangements, each with its own unique style. I would proudly display these in my living room, outside of my home, or even on my dinner table as a centerpiece.
Honestly, I can’t decide which one is my favorite, and I plan to re-create each of these again. I’m also excited to try other, different fall floral pumpkin arrangements in the future!
Pin It!

Add this graphic to your Pinterest boards to get some fabulous ideas from these floral pumpkins.


](http://images.ctfassets.net/f60q1anpxzid/asset-9303316dd91f411dd9ca3dcb868fd613/31d798251ff60f10c7615b2ddfb13629/01_FP_Template_I_Tried_Simple_Template-1.jpg)